Conservation Diary 2: Repairing the damaged and dry

As promised, I am back with some more exciting and fresh updates. Good progress has been made!

The first week flew by in the setting up of and preliminary preparations for the conservation project of the first 1951 wall hanging. In the second week I felt myself drifting off far away, swayed by the humming sound of the controlled variable suction vacuum cleaner as I continued to rhythmically surface-clean both the front and back of the wall hanging. I felt completely in tune with myself. I pictured myself in the beautiful countryside of Kent and imagined how farming life would have been back in the 1950s, helped by how the resist-dyed wall hanging has a plethora of so many vibrant colours.

As the conservation of the wall hanging progressed, two further tests were undertaken – the first to determine the dye fastness of every different colour used in the hanging when exposed to moisture – the second to assess the effectiveness of humidification treatment in relaxing creases…

1

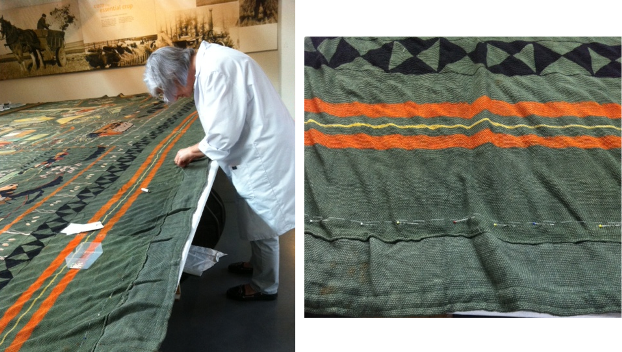
Kate is performing the humidification test and the dye fastness test of every different colour


Then, Kate also examined the two holes in the wall hanging. The first was a small square like shaped with frayed edges shown below in the picture on one of the orange Oast Houseroofsand the other was a bigger hole on the green patch in a more elongated shape.

2

Conservator Kate Gill examining an area of loss in the hanging


3

The conservator is making a template on one area of loss in preparation of the conservation support


There were some old repairs on the centre seam which were causing damage to the wall hanging. Kate thoroughly examined its condition and decided that the best treatment to preserve it was to remove the old repairs.

4

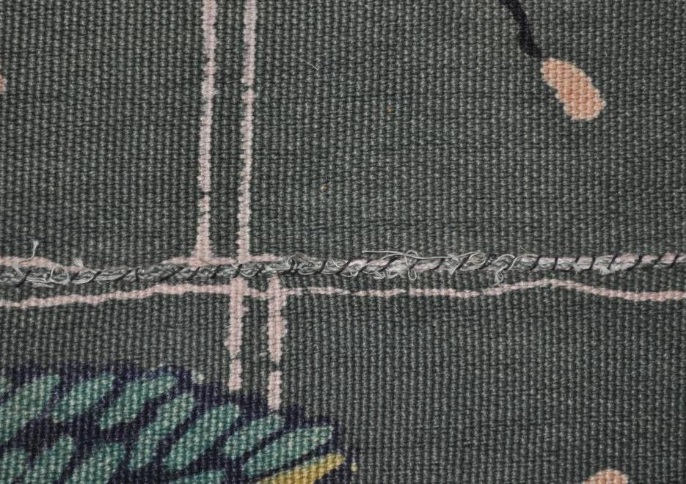
Detail of damaging repairs along centre seam


I shall leave you to digest the same excitement that I felt while assisting on this unique project.

Watch this space for more interesting insights into the conservation of the 1951 wall hangings… until then you are very welcome to come and meet us at the Museum of English Rural Life where you can see the real action happening!

Conservation Diary: Week 1 on our 1951 Wall Hanging

My name is Nitisha Ramrekha-Heeramun and over the next few weeks  I will be blogging about the conservation of two large and colourful resist-dyed textile wall hangings produced by the renowned artist, Michael O’Connell, for the Festival of Britain in 1951.

I started volunteering at the Museum of English Rural Life in August 2013 under the supervision of Fred the MERL conservator, during which time I have picked up valuable practical conservation skills and knowledge. I feel privileged to have the opportunity of working closely with our contracted specialist textile conservator, Kate Gill, and assisting with the conservation of the wall hangings.  Professionally, I have a legal background, but my real passion is to preserve and care for our cultural heritage and I aspire to have a fulfilling career in this field.

The idea of blogging about the conservation of the two wall hangings came about when I felt the need to make you, the audience, re-live the experience of being in such close proximity with and handling such well-guarded artefacts. I hope that you will enjoy reading through this blog as much as I enjoy writing about it!

I was thrown completely in at the deep end on the very first day! It was absolutely fascinating to marvel at the splendour and magnificence of the first wall hanging as Fred and Kate carefully unwrapped it on this huge white table.

Our very large workspace is made from 30 individual tables.

Our very large workspace is made from 30 individual tables.

There are seven wall hangings in the collection and each measure just under seven by four meters. I could not help but think of the countless hours and effort gone into the creation of such a beautiful textile. Everyone stared in awe from the first floor of the gallery from where you can have a panoramic view of the wall hanging. The hanging depicts the county of Kent.

The aim of the conservation project is to make the hanging sufficiently stable for display.  Following conservation, the hanging will be hung by means of Velcro™ and supported on a sloping display board protected behind glass within a bespoke display case. A lot of work will need to be done before this can safely happen.

A year ago Kate carried out an initial condition assessment and suggested an outline conservation treatment plan.

The Kent wall hanging was chosen as the first because it had more problem areas, like an inappropriate early repaired seam, which caused damage and two small holes with frayed edges.

Kent unveiled!

Kent unveiled!

So, we were all set to go! I could not help feeling the rush of adrenaline down my spine as I was about to become physically involved in the conservation and preservation of such a massive piece of art.


The initial preparation stages

Due to sixty years of being stored rolled up the textile was severely distorted and creased. Firstly, Kate carefully aligned the hanging as best as possible to the edge of the table and thoroughly examined the fabric and condition of the hanging; documenting and noting down areas of weakness and analysing and further evaluating the different treatment options available.

I learnt quite quickly that forward-planning is crucial in this line of work, especially when treating such a large object – it felt like having a plan of attack on a battle field! You have to think of every possibility in detail and most importantly, consider the best and worst case scenarios that could occur and be prepared for it! This initial stage of forward planning, although time-consuming, is of paramount importance and also allows for the workload to be streamlined at the later stages.

First things first… Kate Gill, establishes a registration point along the uneven edge of the hanging to determine the positioning of the Velcro™ support mechanism.


First things first… Kate Gill establishes a registration point along the uneven edge of the hanging to determine the positioning of the Velcro™ support mechanism.


3


An image of the hanging was marked out in one metre squares to help keep track of progress.


4


Following this, the hanging was surface cleaned on both sides using a variable controlled suction vacuum cleaner…a process that took most of my whole week. Ouch, my poor knees!


Keep tuned for more on the conservation of this hanging! It is also free to view the Hangings as they are being conserved within the gallery.